ChatGPTならカレンダーくらいお手のものだろう。そう思った私はおもむろにブラウザを開きプロンプトに打ち込んだ。
今回の記事ではChatGPTにカレンダーを作らせてみたときの話をさせていただく。
ChatGPTが作成したソース、完成したカレンダーのリンクも添付しておくので何かのお役に立てれば幸いだ。
1. 感想から
結論から言うとChatGPTだけで完成しなかった。
どうしても細かい修正は人の手で行う必要があるし、自動生成されたソースもたまに微妙な個所があったりするから人間によるレビューは必須である。今回感じた感想は下記2点。
(1)ボリュームの大きすぎるソースは書けない
当初、高機能かつ洗礼されたカレンダーを想定した指示をプロンプトに入力したところ、まず「全部は書けませんが・・」という言葉が出力され、それに続いてソースファイル一覧、それぞれのソースの役割、主要な関数のテンプレート(処理は空っぽ)だけを生成してくれた。これだけでも十分といえば十分なんだけど、今回はソース(ロジック)を全部書いて欲しかったので作戦変更、簡易的なカレンダーを作ってもらうようにした。
(2)ソースの追加修正が苦手っぽい
実は今回、生成されたソースに対して何度か修正を依頼した。するとChatGPTは修正部分のソースしか生成してくれないので、私は既存ソースから該当箇所を見つけて手動で貼り付けるという手間が発生した。またChatGPTは記憶力が弱いのか、修正ソースに含まれる関数名などが既存ソースとは異なっている場合があった。その都度私は関数名を手動で修正してから貼り付けるという手間が発生した。
2. ChatGPTとのやりとり
(1) プロンプト
プロンプトに入力した指示は次の通りだ。思いつくまま書いたのでところどころ変な日本語になっていることはご了承いただきたい。なおChatGPTはちゃんと行間を読み取ってくれて、私のイメージに近いものに仕上げてくれた。
・カレンダー形式で予定を登録できるスケジューラをPHPで作成してください。
・時間単位で予定を登録できるようにしてください。
・データベースはmysqlを使ってください。
・カレンダー形式で表示してほしいです。
・カレンダーに表示されている予定のタイトルをクリックすると予定の詳細を表示させてください
・カレンダーに、前月へ、次月へ というリンクを追加したいです。
・カレンダーに予定を表示させるときに開始時間、終了時間も表示させてください
・CSSで画面を装飾してください。googleカレンダーのような見た目にしたいです
・カレンダーの各曜日の横幅は同じ幅にしたいです
・予定を登録する際に色を指定できるようにしてください。カレンダーに表示するときはその色をタイトルの背景色にしてください。色はパステルカラーで5色用意してください。
(2) テーブル定義
まず出てきたのはテーブル定義。とてもシンプルなものであった。
簡単なカレンダーであればこれで十分であろう。なおコメントは私があとから追加した。
CREATE TABLE events (
id INT AUTO_INCREMENT PRIMARY KEY,  -- キー
title VARCHAR(255) NOT NULL,        -- タイトル
start_date DATE NOT NULL,           -- 開始日
start_time TIME NOT NULL,           -- 開始時間
end_time TIME NOT NULL,             -- 終了時間
color VARCHAR(10) NOT NULL DEFAULT 'color1'  -- 表示色
);
(3) ソースファイルの構成
ChatGPTが考えたソースの構成は下記のとおり。
3つのPHPを生成してくれた。カレンダー画面と予定詳細画面の2画面構成となっている。
データベースの定義は別ファイルに分けてくれた。スタイルシートはHTMLに直書きしてきたので、あとから私が手動でstyle.cssに移し替えた。実際のソースの内容は記事の最後に付けておく。
| index.php(メインページ) | カレンダーを表示する画面 予定の入力フォームも含まれている |
| event_details.php | 予定詳細画面 カレンダーに表示されている予定タイトルをクリックするとここに遷移する |
| config.php | データベース接続情報を作成する |
| style.css | 画面のスタイル定義 |
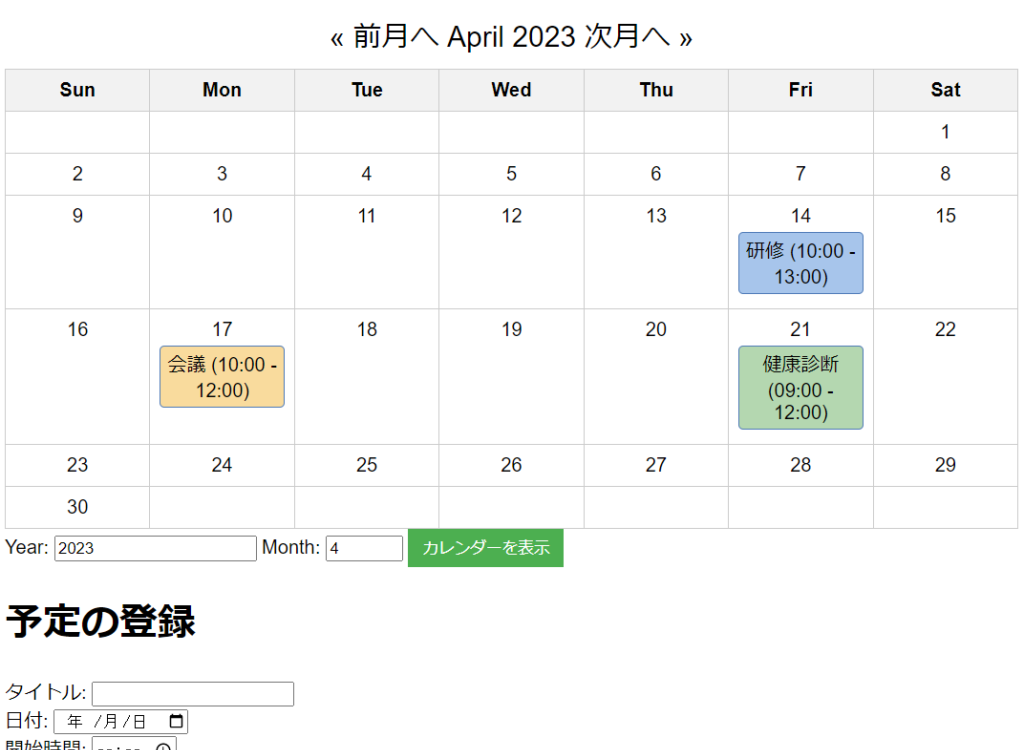
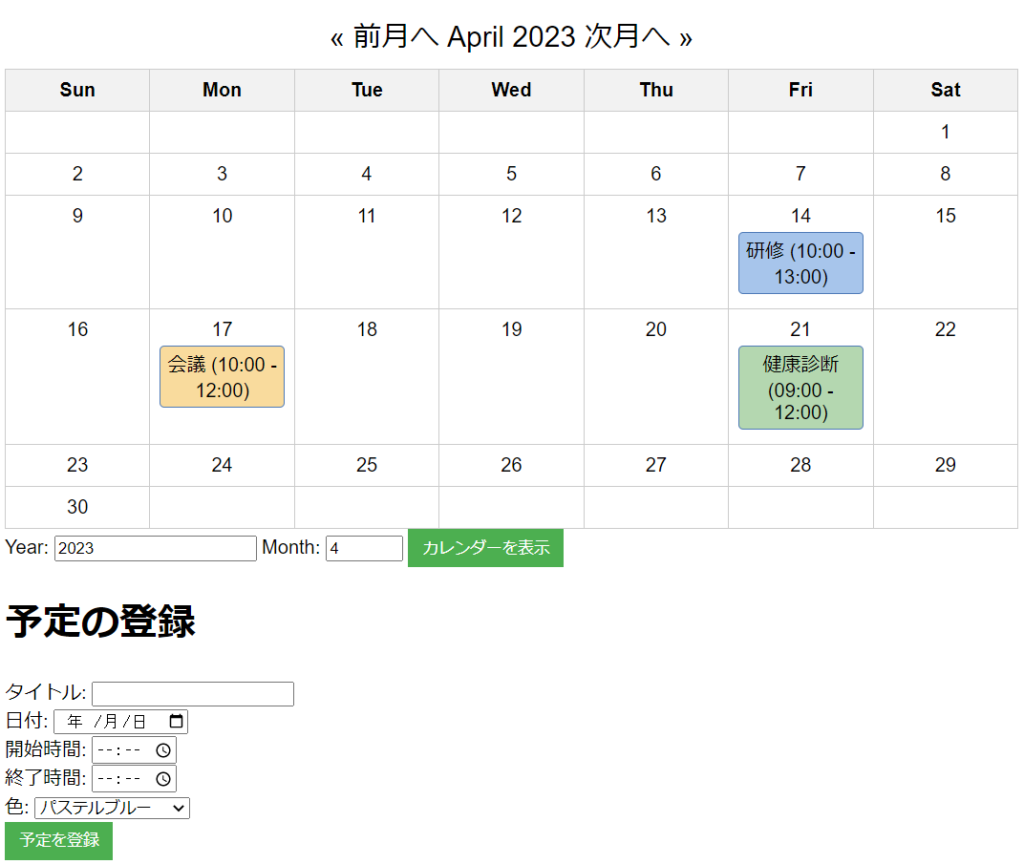
(4) 完成したもの
ChatGPTが生成したソース一式をサーバに配置してブラウザからアクセスしてみた。
確かに見た目はgoogleカレンダーっぽくなっている。
①画面イメージ
②デモサイト
完成したカレンダーはこちらにアップしています。
https://t4ap.com/cal/index.php
3. ソース詳細
それでは最後にChatGPTが作成したソースファイルをのせておく。
(1) index.php
<?php
include 'config.php';
if ($_SERVER['REQUEST_METHOD'] === 'POST') {
$title = $_POST['title'];
$start_date = $_POST['start_date'];
$start_time = $_POST['start_time'];
$end_time = $_POST['end_time'];
$color = $_POST['color'];
$sql = "INSERT INTO events (title, start_date, start_time, end_time, color) VALUES (?, ?, ?, ?, ?)";
$stmt = $conn->prepare($sql);
$stmt->bind_param("sssss", $title, $start_date, $start_time, $end_time, $color);
$stmt->execute();
$stmt->close();
}
function generate_calendar($year, $month, $events)
{
$first_day_of_month = mktime(0, 0, 0, $month, 1, $year);
$days_in_month = date('t', $first_day_of_month);
$month_name = date('F', $first_day_of_month);
$day_of_week = date('w', $first_day_of_month);
$prev_month = $month - 1;
$prev_year = $year;
$next_month = $month + 1;
$next_year = $year;
if ($prev_month == 0) {
$prev_month = 12;
$prev_year--;
}
if ($next_month == 13) {
$next_month = 1;
$next_year++;
}
$calendar = "<table border='1'>";
$calendar .= "<caption>";
$calendar .= "<a href='?year={$prev_year}&month={$prev_month}'>« 前月へ</a> ";
$calendar .= "{$month_name} {$year} ";
$calendar .= "<a href='?year={$next_year}&month={$next_month}'>次月へ »</a>";
$calendar .= "</caption>";
$calendar .= "<tr><th>Sun</th><th>Mon</th><th>Tue</th><th>Wed</th><th>Thu</th><th>Fri</th><th>Sat</th></tr>";
$calendar .= "<tr>";
for ($i = 0; $i < $day_of_week; $i++) {
$calendar .= "<td></td>";
}
for ($day = 1; $day <= $days_in_month; $day++, $day_of_week++) {
if ($day_of_week % 7 == 0) {
$calendar .= "</tr><tr>";
}
$date = "{$year}-" . str_pad($month, 2, '0', STR_PAD_LEFT) . '-' . str_pad($day, 2, '0', STR_PAD_LEFT);
$calendar .= "<td valign='top'><div>{$day}</div>";
if (isset($events[$date])) {
foreach ($events[$date] as $event) {
$start_time = date("H:i", strtotime($event['start_time']));
$end_time = date("H:i", strtotime($event['end_time']));
$calendar .= "<div class='event " . htmlspecialchars($event['color']) . "'><a href='event_details.php?id=" . $event['id'] . "'>" . htmlspecialchars($event['title']) . "</a> ({$start_time} - {$end_time})</div>";
}
}
$calendar .= "</td>";
}
while ($day_of_week % 7 != 0) {
$calendar .= "<td></td>";
$day_of_week++;
}
$calendar .= "</tr>";
$calendar .= "</table>";
return $calendar;
}
$year = isset($_GET['year']) ? intval($_GET['year']) : date('Y');
$month = isset($_GET['month']) ? intval($_GET['month']) : date('n');
$sql = "SELECT * FROM events WHERE YEAR(start_date) = ? AND MONTH(start_date) = ?";
$stmt = $conn->prepare($sql);
$stmt->bind_param("ii", $year, $month);
$stmt->execute();
$result = $stmt->get_result();
$events = [];
while ($row = $result->fetch_assoc()) {
$date = $row['start_date'];
if (!isset($events[$date])) {
$events[$date] = [];
}
$events[$date][] = $row;
}
$stmt->close();
?>
<!DOCTYPE html>
<html lang="ja">
<head>
<meta charset="UTF-8">
<title>カレンダースケジューラ</title>
<link rel="stylesheet" href="style.css">
</head>
<body>
<?php echo generate_calendar($year, $month, $events); ?>
<form action="index.php" method="get">
<label for="year">Year:</label>
<input type="number" name="year" id="year" value="<?php echo $year; ?>" required>
<label for="month">Month:</label>
<input type="number" name="month" id="month" min="1" max="12" value="<?php echo $month; ?>" required>
<input type="submit" value="カレンダーを表示">
</form>
<h1>予定の登録</h1>
<form action="index.php" method="post">
<label for="title">タイトル:</label>
<input type="text" name="title" id="title" required>
<br>
<label for="start_date">日付:</label>
<input type="date" name="start_date" id="start_date" required>
<br>
<label for="start_time">開始時間:</label>
<input type="time" name="start_time" id="start_time" required>
<br>
<label for="end_time">終了時間:</label>
<input type="time" name="end_time" id="end_time" required>
<br>
<!-- 他のフォームフィールドの後に追加 -->
<label for="color">色:</label>
<select name="color" id="color">
<option value="color1">パステルブルー</option>
<option value="color2">パステルグリーン</option>
<option value="color3">パステルイエロー</option>
<option value="color4">パステルピンク</option>
<option value="color5">パステルパープル</option>
</select>
<br>
<input type="submit" value="予定を登録">
</form>
</body>
</html>
<?php $conn->close(); ?>(2) event_details.php
<?php
include 'config.php';

if (!isset($_GET['id'])) {
  die("エラー: イベントIDがありません");
}

$event_id = intval($_GET['id']);

$sql = "SELECT * FROM events WHERE id = ?";
$stmt = $conn->prepare($sql);
$stmt->bind_param("i", $event_id);
$stmt->execute();
$result = $stmt->get_result();

if ($result->num_rows == 0) {
  die("エラー: イベントが見つかりません");
}

$event = $result->fetch_assoc();
$stmt->close();
?>

<!DOCTYPE html>
<html lang="ja">

<head>
  <meta charset="UTF-8">
  <title>予定の詳細</title>
</head>

<body>
  <h1><?php echo htmlspecialchars($event['title']); ?></h1>
  <p>日付: <?php echo htmlspecialchars($event['start_date']); ?></p>
  <p>開始時間: <?php echo htmlspecialchars($event['start_time']); ?></p>
  <p>終了時間: <?php echo htmlspecialchars($event['end_time']); ?></p>
  <a href="index.php">カレンダーに戻る</a>
</body>

</html>
<?php $conn->close(); ?>
(3) config.php
<?php
$servername = "xxxxxxxxxxxxxx";
$username = "xxxxxxxxxxxx";
$password = "xxxxxxxx";
$dbname = "xxxxxxxxxxx";

$conn = new mysqli($servername, $username, $password, $dbname);

if ($conn->connect_error) {
  die("Connection failed: " . $conn->connect_error);
}
(4) style.css
※marginなど一部私が追加した箇所もある。
body {
  font-family: Arial, sans-serif;
}
table {
  table-layout: fixed;
}
td,
th {
  width: 14.2857%;
  /* 100% / 7 */
}
.event {
  white-space: normal;
  word-wrap: break-word;
}
table {
  border-collapse: collapse;
  width: 100%;
}
td,
th {
  border: 1px solid #ccc;
  text-align: center;
  padding: 8px;
}
th {
  background-color: #f2f2f2;
  font-weight: bold;
}
a {
  text-decoration: none;
  color: #000;
}
a:hover {
  text-decoration: underline;
}
caption {
  font-size: 24px;
  padding: 8px;
  text-align: center;
}
form {
  margin-bottom: 24px;
}
input[type="submit"] {
  background-color: #4CAF50;
  color: white;
  padding: 6px 12px;
  border: none;
  cursor: pointer;
}
input[type="submit"]:hover {
  background-color: #45a049;
}
.event {
  background-color: #cfe2f3;
  border: 1px solid #4e7ab7;
  border-radius: 4px;
  padding: 4px;
  margin: 4px 0;
}
.color1 {
  background-color: #a7c5eb;
}
.color2 {
  background-color: #b4d7b0;
}
.color3 {
  background-color: #f9db9d;
}
.color4 {
  background-color: #f6b5d6;
}
.color5 {
  background-color: #c9b1e1;
}